






Step-by-Step Cooking Guide for Perfect Results
Preparing and Coating the Chicken
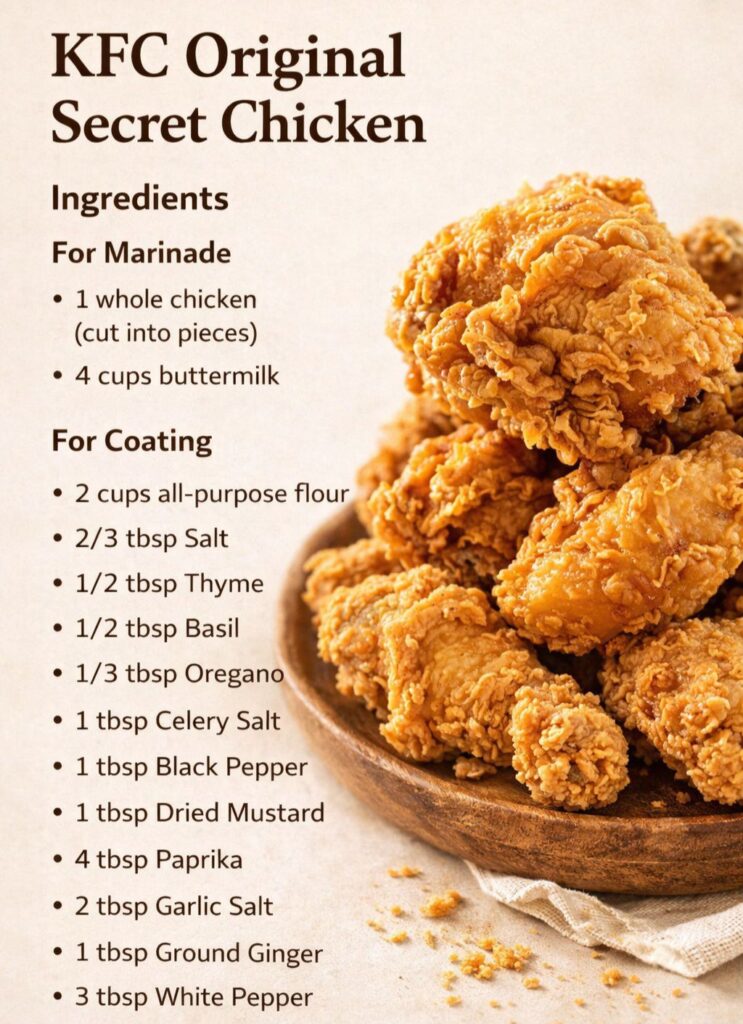
Start by removing the chicken from the buttermilk marinade. Allow excess liquid to drip off, but do not dry the chicken completely. A slightly wet surface helps the flour mixture stick better.
Next, dredge each piece in the seasoned flour. Press the mixture firmly onto the chicken to create a thick layer. This step is crucial for achieving that signature crunch.
Place the coated chicken on a wire rack and let it rest for about 15 minutes. During this time, the coating will hydrate slightly, which prevents it from falling off during frying.
Frying to Golden Perfection
Heat vegetable oil to 350°F (175°C). Maintaining the correct temperature is essential. If the oil is too hot, the coating burns before the inside cooks. If it’s too cool, the chicken absorbs excess oil and becomes greasy.
Fry the chicken in batches to avoid overcrowding. This keeps the oil temperature stable and ensures even cooking. Turn the pieces occasionally for uniform browning.
Cook until the chicken reaches an internal temperature of 165°F (74°C). The outside should be golden brown and crispy, while the inside remains juicy and tender.
Tips to Make Your Fried Chicken Even Better
Achieving Extra Crispy Texture
For extra crunch, double-dip the chicken. After the first coating, dip it back into the buttermilk and coat it again with flour. This creates a thicker crust that becomes incredibly crispy when fried.
You can also add a small amount of cornstarch to the flour mixture. This helps create a lighter, crispier texture.
Letting the chicken rest after coating is another key step. It allows the flour to absorb moisture, which results in a better crust during frying.
Keeping the Chicken Juicy Inside
Avoid overcooking the chicken. Use a thermometer to check doneness instead of guessing. This ensures the meat stays juicy while still being fully cooked.
Additionally, do not overcrowd the pan. Too many pieces at once lower the oil temperature, which affects both texture and cooking time.
After frying, place the chicken on a wire rack instead of paper towels. This prevents steam from softening the crispy coating.
Serving Ideas and Flavor Variations
Classic Serving Suggestions
Serve this KFC Original Secret Chicken Recipe hot and fresh. It pairs perfectly with mashed potatoes, coleslaw, or buttery biscuits. These sides complement the crispy texture and rich flavor of the chicken.
You can also add dipping sauces like honey mustard, barbecue sauce, or spicy mayo for extra variety. Each sauce brings a new twist to the dish.
For a complete meal, include a fresh salad or roasted vegetables. This balances the richness of the fried chicken and creates a satisfying plate.
Creative Variations to Try
If you want to experiment, try adding cayenne pepper to the flour mixture for extra heat. You can also adjust the spice levels to suit your taste.
Another option is to use boneless chicken for easier eating. Chicken tenders or fillets work well with the same marinade and coating.
For a lighter version, you can bake or air-fry the chicken. While the texture will differ slightly, the flavor remains delicious.
Frequently Asked Questions
How long should I marinate the chicken?
Marinate for at least 2 hours. However, overnight marination provides the best flavor and tenderness.
Can I use regular milk instead of buttermilk?
Yes, but add a tablespoon of vinegar or lemon juice to mimic buttermilk’s acidity.
Why is my coating falling off?
This usually happens if you skip the resting step after coating or if the oil temperature is too low.
Can I reuse the frying oil?
Yes, strain and store it properly. However, avoid reusing it multiple times for best flavor.
How do I store leftovers?
Store in an airtight container in the refrigerator for up to 3 days. Reheat in an oven to maintain crispiness.
Conclusion
This KFC Original Secret Chicken Recipe makes it easy to enjoy crispy, flavorful fried chicken at home. With a rich marinade, perfectly seasoned coating, and simple frying technique, you can recreate a restaurant-style dish in your own kitchen.
Once you try this recipe, you’ll appreciate how each step contributes to the final result. From the buttermilk soak to the golden fry, every detail matters. With practice, you’ll master the process and create fried chicken that rivals your favorite takeout.
Leave a Reply