


Cherry Bars are a timeless dessert that strike the perfect balance between sweet and tart, soft and crisp. With a buttery base, vibrant cherry filling, and a golden crumble topping, these bars are the kind of treat that fits any occasion. Whether you are baking for a holiday, a summer gathering, or a quiet evening at home, Cherry Bars always feel right.
What makes Cherry Bars so appealing is their simplicity. The dough comes together quickly, the filling is easy to spread, and the oven does the rest. Despite the straightforward process, the result feels bakery-worthy. Each bite delivers rich butter flavor, bright cherry sweetness, and just enough almond essence to elevate the entire dessert.
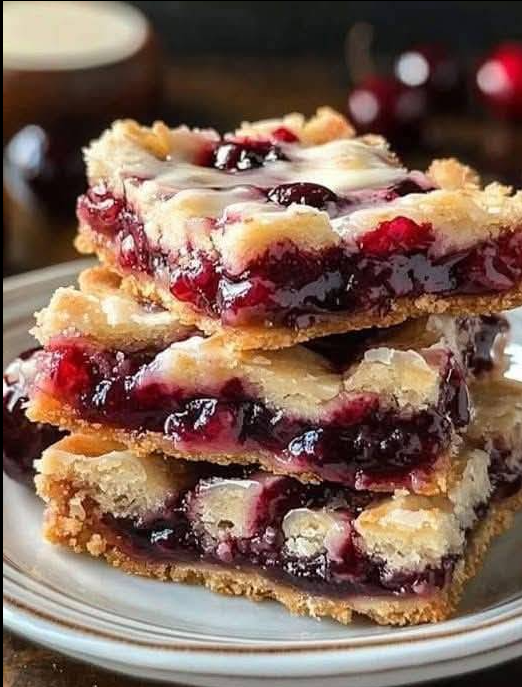
These Cherry Bars slice beautifully once cooled, making them ideal for sharing. They travel well, store easily, and taste just as good the next day. If you enjoy classic desserts with reliable results, Cherry Bars deserve a permanent spot in your baking rotation.
The first time I made these bars was for a casual get-together when I needed a dessert that didn’t require frosting or decorating. I wanted something comforting and familiar. As they baked, the cherries bubbled gently under the crumb topping, and the kitchen filled with a warm, buttery aroma. Once cooled, I cut them into squares and watched them disappear faster than anything else on the table. Since then, Cherry Bars have become my dependable go-to whenever I need a dessert that everyone loves.
Why Cherry Bars Never Go Out of Style
A Perfect Balance of Flavors
Cherry Bars work so well because they balance richness and brightness. The buttery crust provides a soft yet sturdy base, while the cherry filling adds a tart contrast that keeps the bars from tasting overly sweet.
The hint of almond extract enhances the cherry flavor without overpowering it. This small detail makes Cherry Bars taste more complex and refined, even though the recipe itself is very simple.
Ideal Texture in Every Bite
Texture plays a big role in the appeal of Cherry Bars. The bottom layer is tender and slightly crisp, the filling is smooth and juicy, and the crumb topping adds a light crunch.
Because part of the dough is pressed into the pan and the rest is crumbled on top, the bars naturally create layers. This structure makes them satisfying to eat and easy to slice cleanly once cooled.
Ingredients That Make Cherry Bars Shine
Simple Pantry Staples
Cherry Bars rely on basic baking ingredients you likely already have. Butter, sugar, flour, and egg form the foundation of the dough. Softened butter is key, as it blends smoothly with the sugar and creates a cohesive dough.
Vanilla extract adds warmth, while salt balances sweetness. These small details ensure the bars taste rich but not flat.
Cherry Filling and Flavor Boosters
Cherry pie filling keeps the recipe quick and consistent. It provides the right balance of sweetness and texture without extra steps. Spreading it evenly ensures every bar has plenty of cherry goodness.
Almond extract is optional but highly recommended. It pairs naturally with cherries and adds depth that makes Cherry Bars taste bakery-quality rather than basic.
Step-by-Step Baking Process
Making the Dough
Start by preheating the oven to 350°F and greasing a 9×9-inch baking pan. In a mixing bowl, beat the softened butter and sugar until light and creamy. This step incorporates air and helps create a tender texture.
Add the egg, vanilla extract, and almond extract, mixing until fully combined. Gradually add the flour and salt, stirring until a soft dough forms. The dough should be thick but pliable.
Layering and Baking
Press about two-thirds of the dough evenly into the bottom of the prepared pan. This forms the base. Spread the cherry pie filling evenly over the dough, reaching the edges.
Crumble the remaining dough over the top of the cherries. This creates a rustic, golden topping as it bakes. Bake for 25 to 30 minutes, or until the top is lightly golden and the filling is bubbling.
Allow the bars to cool completely before cutting. This cooling time helps the layers set and ensures clean slices.
Tips for the Best Cherry Bars
Baking and Cooling
Avoid overbaking. The bars should be golden on top but still soft in the center. Overbaking can dry out the crust.
Cooling is essential. Cutting too soon can cause the filling to run. Letting the bars cool fully gives you neat, bakery-style squares.
Easy Adjustments
If you prefer a thicker base, press a little more dough into the bottom and reduce the crumble topping slightly. For extra crunch, sprinkle sliced almonds over the top before baking.
Lining the pan with parchment paper makes removal and slicing even easier.
Ingredients
Equipment
Method
- Preheat oven to 350°F and grease a 9×9-inch baking pan.
- Beat butter and sugar until creamy. Add egg, vanilla, and almond extract.
- Mix in flour and salt until a dough forms.
- Press two-thirds of the dough into the pan. Spread cherry filling on top.
- Crumble remaining dough over filling and bake 25–30 minutes until golden.
- Cool completely before cutting into squares.
Nutrition
Notes
Tried this recipe?
Let us know how it was!Variations to Try
Flavor Twists
You can easily adapt Cherry Bars with different fillings. Blueberry, raspberry, or mixed berry pie filling all work well. Each option creates a slightly different flavor profile while keeping the same buttery base.
For a richer taste, add a touch of lemon zest to the dough. This brightens the flavor and complements the fruit filling.
Texture and Dietary Options
To add texture, mix a tablespoon of oats into the crumble topping. For a softer bar, reduce the baking time slightly.
If needed, a gluten-free all-purpose flour blend can replace regular flour with good results.
Serving and Storage
How to Serve
Cherry Bars are delicious on their own, but they also pair well with a scoop of vanilla ice cream or a dollop of whipped cream. Serving them at room temperature brings out their full flavor.
They work equally well as a dessert or a sweet snack alongside coffee or tea.
Storage Tips
Store Cherry Bars in an airtight container at room temperature for up to two days or in the refrigerator for up to five days. They also freeze well, making them a great make-ahead dessert.
Frequently Asked Questions
Can I use homemade cherry filling?
Yes, homemade filling works as long as it’s thick enough.
Do I need almond extract?
No, but it enhances the cherry flavor significantly.
Can I double the recipe?
Yes, use a 9×13-inch pan and adjust baking time slightly.
Why are my bars crumbly?
They may need more cooling time to fully set.
Can I freeze Cherry Bars?
Yes, freeze tightly wrapped for up to three months.
Conclusion
Cherry Bars are a classic dessert that delivers big flavor with minimal effort. With their buttery crust, vibrant cherry filling, and golden crumble topping, they’re the kind of treat that feels both nostalgic and satisfying. Easy to make, easy to share, and always a hit, Cherry Bars are a recipe you’ll come back to again and again.
Leave a Reply