


Preparing the Filling
Start by sautéing diced onions in a little oil until soft and translucent. Then add garlic and cook briefly until fragrant. Stir in shredded chicken, green chiles, cumin, chili powder, salt, and a small amount of enchilada sauce.
The filling should stay moist but not watery. If it becomes too wet, the tortillas may become soggy during baking. Once heated through, remove the mixture from the stove and stir in a handful of shredded cheese.
Warm the tortillas slightly before rolling. This step makes them more flexible and prevents tearing. You can microwave them for a few seconds or heat them briefly in a skillet.
Rolling and Baking the Enchiladas
Spread a thin layer of enchilada sauce across the bottom of the baking dish. Then spoon the chicken mixture into each tortilla and roll tightly. Arrange them seam-side down in the prepared dish.
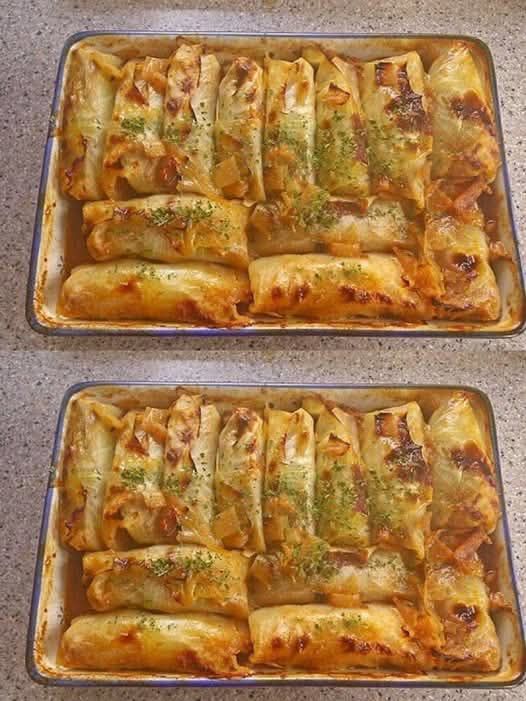
Pour the remaining sauce evenly over the enchiladas. Next, sprinkle a generous layer of shredded cheese on top. Cover the dish loosely with foil and bake until heated through.
During the last few minutes, remove the foil so the cheese becomes bubbly and golden brown. This step creates the irresistible cheesy crust seen in classic Cheesy Baked Chicken Enchiladas.
Allow the enchiladas to rest for several minutes before serving. This helps the filling set slightly and makes serving easier.
Serving and Storing Cheesy Baked Chicken Enchiladas
Delicious Side Dishes and Toppings
Cheesy Baked Chicken Enchiladas pair well with many easy side dishes. Spanish rice, black beans, cilantro lime rice, or a crisp salad all complement the rich flavors beautifully.
Fresh toppings brighten the dish and add contrast. Sour cream cools the spice while chopped cilantro adds freshness. Diced avocado contributes creaminess, and sliced jalapeños bring extra heat for those who enjoy spice.
For a restaurant-style presentation, garnish the enchiladas with chopped green onions and a small squeeze of lime juice before serving.
Storage and Reheating Tips
Leftover enchiladas store well in the refrigerator for up to four days. Keep them covered tightly to maintain moisture and freshness.
To reheat, place the enchiladas in the oven at 350°F until warmed through. Adding a spoonful of extra sauce before reheating helps prevent dryness. Microwave reheating also works for quick lunches and leftovers.
If freezing, assemble the enchiladas before baking. Wrap the pan tightly with plastic wrap and foil. When ready to cook, thaw overnight in the refrigerator and bake as directed.
Because these Cheesy Baked Chicken Enchiladas hold up so well, they remain an excellent make-ahead meal for busy weeks and special occasions alike.
Frequently Asked Questions
Can I use corn tortillas instead of flour tortillas?
Yes. Corn tortillas create a more traditional enchilada flavor. Warm them first to prevent cracking while rolling.
Can I make Cheesy Baked Chicken Enchiladas ahead of time?
Absolutely. Assemble the enchiladas up to 24 hours in advance and refrigerate until ready to bake.
What cheese melts best for enchiladas?
Cheddar, Monterey Jack, and pepper jack all melt beautifully. A combination often gives the best texture and flavor.
How do I keep enchiladas from becoming soggy?
Avoid using too much sauce inside the filling. Also, lightly warming the tortillas helps them maintain structure.
Can I freeze baked enchiladas?
Yes. Let them cool completely, wrap tightly, and freeze for up to three months.
Conclusion
Cheesy Baked Chicken Enchiladas offer the perfect combination of comfort, convenience, and bold flavor. Tender chicken, rich enchilada sauce, and gooey melted cheese create a satisfying meal that works for weeknight dinners, gatherings, and meal prep alike.
This recipe stays simple enough for beginners while still delivering impressive results every time. With customizable fillings, easy preparation, and excellent leftovers, these enchiladas quickly become a family favorite. Once you pull a bubbling tray from the oven, it is easy to understand why this comforting dish remains so popular.
How to Make Cheesy Baked Chicken Enchiladas
Preparing the Filling
Start by sautéing diced onions in a little oil until soft and translucent. Then add garlic and cook briefly until fragrant. Stir in shredded chicken, green chiles, cumin, chili powder, salt, and a small amount of enchilada sauce.
The filling should stay moist but not watery. If it becomes too wet, the tortillas may become soggy during baking. Once heated through, remove the mixture from the stove and stir in a handful of shredded cheese.
Warm the tortillas slightly before rolling. This step makes them more flexible and prevents tearing. You can microwave them for a few seconds or heat them briefly in a skillet.
Rolling and Baking the Enchiladas
Spread a thin layer of enchilada sauce across the bottom of the baking dish. Then spoon the chicken mixture into each tortilla and roll tightly. Arrange them seam-side down in the prepared dish.
Pour the remaining sauce evenly over the enchiladas. Next, sprinkle a generous layer of shredded cheese on top. Cover the dish loosely with foil and bake until heated through.
During the last few minutes, remove the foil so the cheese becomes bubbly and golden brown. This step creates the irresistible cheesy crust seen in classic Cheesy Baked Chicken Enchiladas.
Allow the enchiladas to rest for several minutes before serving. This helps the filling set slightly and makes serving easier.
Serving and Storing Cheesy Baked Chicken Enchiladas
Delicious Side Dishes and Toppings
Cheesy Baked Chicken Enchiladas pair well with many easy side dishes. Spanish rice, black beans, cilantro lime rice, or a crisp salad all complement the rich flavors beautifully.
Fresh toppings brighten the dish and add contrast. Sour cream cools the spice while chopped cilantro adds freshness. Diced avocado contributes creaminess, and sliced jalapeños bring extra heat for those who enjoy spice.
For a restaurant-style presentation, garnish the enchiladas with chopped green onions and a small squeeze of lime juice before serving.
Storage and Reheating Tips
Leftover enchiladas store well in the refrigerator for up to four days. Keep them covered tightly to maintain moisture and freshness.
To reheat, place the enchiladas in the oven at 350°F until warmed through. Adding a spoonful of extra sauce before reheating helps prevent dryness. Microwave reheating also works for quick lunches and leftovers.
If freezing, assemble the enchiladas before baking. Wrap the pan tightly with plastic wrap and foil. When ready to cook, thaw overnight in the refrigerator and bake as directed.
Because these Cheesy Baked Chicken Enchiladas hold up so well, they remain an excellent make-ahead meal for busy weeks and special occasions alike.
Frequently Asked Questions
Can I use corn tortillas instead of flour tortillas?
Yes. Corn tortillas create a more traditional enchilada flavor. Warm them first to prevent cracking while rolling.
Can I make Cheesy Baked Chicken Enchiladas ahead of time?
Absolutely. Assemble the enchiladas up to 24 hours in advance and refrigerate until ready to bake.
What cheese melts best for enchiladas?
Cheddar, Monterey Jack, and pepper jack all melt beautifully. A combination often gives the best texture and flavor.
How do I keep enchiladas from becoming soggy?
Avoid using too much sauce inside the filling. Also, lightly warming the tortillas helps them maintain structure.
Can I freeze baked enchiladas?
Yes. Let them cool completely, wrap tightly, and freeze for up to three months.
Conclusion
Cheesy Baked Chicken Enchiladas offer the perfect combination of comfort, convenience, and bold flavor. Tender chicken, rich enchilada sauce, and gooey melted cheese create a satisfying meal that works for weeknight dinners, gatherings, and meal prep alike.
This recipe stays simple enough for beginners while still delivering impressive results every time. With customizable fillings, easy preparation, and excellent leftovers, these enchiladas quickly become a family favorite. Once you pull a bubbling tray from the oven, it is easy to understand why this comforting dish remains so popular.
Leave a Reply