


How to Make Frozen Peanut Butter Cookie Dough Bites
Mixing the Cookie Dough
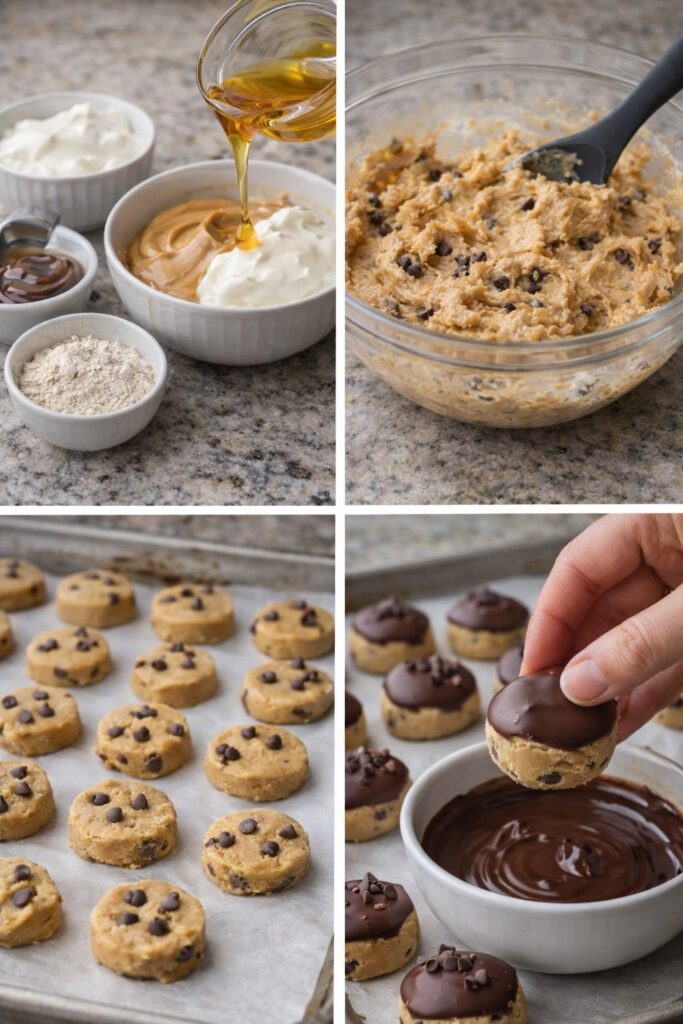
Start by combining Greek yogurt, peanut butter, honey or maple syrup, and vanilla extract in a mixing bowl.
Stir until the mixture becomes smooth and creamy. A spatula works well, but a hand mixer can also speed up the process.
Next, add the oats and chocolate chips. Stir until everything blends evenly and forms a thick cookie dough consistency.
If the mixture feels too soft, add a few extra oats. If it feels too firm, a small spoonful of yogurt can help loosen it.
Shaping the Cookie Dough
Once the dough reaches the right texture, scoop tablespoon-sized portions and roll them into small balls.
Place the dough balls on a baking sheet lined with parchment paper.
Try to keep the sizes consistent so they freeze evenly.
At this stage, you can also roll the bites in chopped nuts, coconut flakes, or sprinkles if desired.
Freezing the Bites
Place the tray in the freezer for about 30 minutes. This step allows the dough to firm up before dipping it in chocolate.
Firm dough balls hold their shape better during the chocolate coating process.
Creating the Chocolate Shell
Melt dark chocolate in a microwave-safe bowl using short intervals, stirring between each interval until smooth.
Remove the frozen dough balls from the freezer.
Dip each one into the melted chocolate, allowing excess chocolate to drip off before placing it back onto the parchment-lined tray.
You can sprinkle sea salt or crushed peanuts on top before the chocolate hardens.
Final Freeze
Return the coated bites to the freezer for another 30 minutes.
This final freeze allows the chocolate shell to fully set and creates the signature crunchy exterior.
Once frozen, transfer the bites to an airtight container and store them in the freezer.
Tips for Perfect Frozen Cookie Dough Bites
Achieving the Best Texture
Texture plays a huge role in the success of this recipe.
Using creamy peanut butter ensures the mixture blends smoothly. Chunky peanut butter can make the dough harder to shape.
The oats should be rolled oats rather than quick oats. They provide better structure and chewiness.
If the mixture feels sticky while shaping the balls, lightly chilling it for a few minutes can help.
Proper Storage
Frozen Peanut Butter Cookie Dough bites store extremely well.
Place them in an airtight container or freezer bag to prevent freezer burn.
When stored properly, they can last up to three months while maintaining their flavor and texture.
Because they remain firm in the freezer, they are easy to grab and enjoy whenever you want a quick treat.
Creative Variations to Try
Nut Butter Alternatives
If you want to experiment with different flavors, try swapping peanut butter with other nut or seed butters.
Almond butter creates a slightly sweeter, more delicate flavor.
Cashew butter produces an ultra-creamy texture and mild taste.
Sunflower seed butter provides a nut-free alternative that works well for people with peanut allergies.
Fun Flavor Additions
There are many ways to customize these cookie dough bites.
Chopped nuts add crunch and extra protein.
Dried fruit such as cranberries or raisins adds natural sweetness and chewiness.
Dark chocolate chunks inside the dough create pockets of rich chocolate in every bite.
You can even add a pinch of cinnamon or espresso powder for a subtle flavor boost.
Frequently Asked Questions
Can I use flavored Greek yogurt?
Yes, but plain yogurt works best because it keeps the sweetness balanced.
How long do these cookie dough bites last in the freezer?
They can be stored in an airtight container for up to three months.
Can I skip the chocolate coating?
Yes. The bites are still delicious without the chocolate shell.
Are these cookie dough bites gluten free?
They can be gluten free if you use certified gluten-free oats.
Can I make these bites dairy free?
Yes. Simply replace Greek yogurt with a dairy-free yogurt alternative.
Conclusion
Frozen Peanut Butter Cookie Dough bites are the perfect blend of convenience, flavor, and texture. With creamy peanut butter centers, protein-packed ingredients, and a crisp chocolate coating, they offer a satisfying treat that is easy to prepare and store.
Because they require no baking and only a handful of ingredients, they are ideal for quick desserts, meal-prep snacks, or sweet cravings during busy days. Once you make a batch and store them in your freezer, you will always have a delicious homemade treat ready to enjoy.
Leave a Reply